
This article provides step-by-step instructions for resigning an .IPA file and how to submit an .IPA file to App Store Connect.
What is an .IPA File?
The IPA file extension is for iOS apps and contains the iOS application bundle. A company may utilize an .IPA file for providing another company a demo of their app without providing the source code. A specific use case that is covered in this article is when an .IPA file is used to enable a transfer, or distribution, of an app to another company. The company receiving the .IPA file in this case may have a need to get the app on the App Store or on TestFlight. To accomplish this, the .IPA file must be unzipped, resigned with the new company’s developer account credentials, and uploaded to App Store Connect. This article provides step-by-step instructions for each process along the way.
Resign an .IPA File
Download the .IPA file to an iMac or MacBook. Open a terminal session and set the current directory to the location of the .IPA file.
Unzip and Update Bundle Identifier
Enter the following commands within terminal replacing the bold inputs with your file names.
unzip App.ipa
rm -rf Payload/App.app/_CodeSignature/
/usr/libexec/PlistBuddy Payload/App.app/Info.plist
Now within the PlistBuddy, enter the new bundle identifier.
set :CFBundleIdentifier com.yourcompany.newbundleidentifier
save
quit
Note: you can simply type the Print command to display the plist contents. Also, other variables you can set using PlistBuddy include CFBundleVersion, CFBundleShortVersionString, CFBundleDisplayName, along with many others.
Alternate to PlistBuddy: alternatively, you can directly edit the desired fields within the Info.plist file all at once with the following command:
nano Payload/App.app/Info.plist
^X to exit
Y to save
Create a Distribution Provisioning Profile
If you don’t already have a distribution provisioning profile, you can create one on the Apple Developer website. If you don’t already have an Apple Developer Account, you can create one using the instructions in another one of our blog posts here.
Sign in to Apple Developer. Select Certificates and create a Distribution certificate. If you don’t already have one, you can create a CSR from the Keychain Access application on your iMac or MacBook.
Select profile and create an App Store distribution provisioning profile selecting the certificate you just created for the new bundle identifier used earlier. Download the provisioning profile.
Back in terminal, copy the provisioning profile.
cp ~/Downloads/ProvisioningProfile.mobileprovision Payload/App.app/embedded.mobileprovision
From our experience, if you move directly into codesigning at this stage, you will receive and error the “resource fork, Finder information, or similar detritus not allowed”.
The Apple Developer Technical Q&A QA1940 states this is a security hardening feature introduced with iOS 10/macOS Sierra where code signing no longer allows any file in an app bundle to have an extended attribute containing a resource fork or Finer info. You can use xattr -lr Payload to determine which file(s) are causing the error, but a more straightforward solution is to run this directly on the mobile provisioning profile as shown.
xattr -cr Payload/App.app/embedded.mobileprovision
Changing the App Icon
Changing the app icon on an .IPA file is not required to resign an .IPA file and upload to App Store Connect. However, there are use cases for this, so we will briefly touch on this optional topic.
App icons are contained in Assets.xcassets within Xcode. As you are likely aware if you’re reading this article, an App Icon consists of multiple files with varying sizes and resolution. In the process of archiving an app, the Assets.xcassets is converted into Assets.car within the .IPA file. This is the file that is now accessible under the Payload folder from the unzipped .IPA file.
First, to ensure you don’t omit any other assets in addition to the app icon, you can determine the contents within Assets.car by using xcrun –sdk iphoneos assetutil –info Payload/App.app/Assets.car. After reviewing the results, you can extract the contents within Assets.car file by using the cartool. After navigating to the cartool path, use ./cartool /path/to/Payload/App.app/Assets.car /path/to/outputDirectory. This process may be useful if you’d like to change the App Icon, but preserve other assets.
To create a new version of Assets.car to replace what is in the Payload folder, create a new XCode project. Upload (drag and drop) the desired asset files, including the new app icon files. Set the build target as Generic iOS Device (Product > Destination > Generic iOS Device). Then archive (Product > Archive). Select distribute, select Development, and select Export. Select a location to save the output, which will contain a new .IPA file. Following the same process outlined above, extract the Assets.car file by unzipping the .IPA file and copying from the new Payload folder. You can use the Asset Catalog Tinkerer to view the Asset.car contents to ensure you have the desired contents.
Finally, replace the old Asset.car with the new Asset.car, which contains the new app icons.
Retrieve Entitlements from App
To create an entitlement.xml from the app, use the following command within the terminal.
codesign -d –entitlements entitlements.xml Payload/App.app
Note: there are two “-” before entitlements
Open the entitlements.xml just created and perform the following steps.
- Remove the integrity check text ahead of <?xml version=”1.0″ encoding=”UTF-8″?> in the first line.
- Replace the application-identifier value. This includes your Team ID along with the bundle identifier. You can find your team ID on the Apple Developer Website in the Membership Details section.
- Replace the team identifier value.
When complete, the entitlements.xml file should look like this. There may be slight variations based on the contents originally included in your entitlements along with the get-task-allow value.
<?xml version=”1.0″ encoding=”UTF-8″?>
<!DOCTYPE plist PUBLIC “-//Apple/DTD PLIST 1.0//EN” “http://www.apple.com/DTDs/PropertyList-1.0.dtd”>
<plist version=”1.0″>
<dict>
<key>application-identifier</key>
<string>TeamID.com.yourcompany.newbundleidentifier</string>
<key>com.apple.developer.team-identifier</key>
<string>TeamID</string>
<key>get-task-allow</key>
<false/>
</dict>
</plist>
Note: if you intend to distribute this build via TestFlight for beta testing, you’ll need to include the beta-reports-active entitlement (set to true).
After you save the entitlements.xml file, you are ready to sign the code.
Distribution Certificate
If you haven’t already, you’ll need to download the Distribution Certificate from the Apple Developer Website used to create the provisioning profile. Double-click the certificate file to install to the keychain. You can open Keychain Access if you want to review the installed certificates on your machine. Alternatively, this forum post allows you to determine the security identities directly from the terminal using security find-identity. Be sure the certificate you plan to use for code signing is present. Also, be sure it is unique – if you have two certificates with the same name, you’ll have to delete one for this exercise. Otherwise, the codesign function cannot discern which certificate you intend to use.
Resign Frameworks
Assuming the app contains Frameworks, you will resign all frameworks first using the command below.
codesign -f -s “Apple Distribution: Certificate Name (Team ID)” Payload/App.app/Frameworks/*
Resign and Zip the App
Next, resign the app and be sure to add the entitlements created earlier.
codesign -f -s “Apple Distribution: Certificate Name (Team ID)” –entitlements entitlements.xml Payload/App.app/
Finally, zip the resigned app to create the new .IPA file.
zip -qr AppResigned.ipa Payload/
You now have a new .IPA file with your new bundle identifier, Team ID, and signed by your own Apple Developer certificate.
Upload an .IPA file to App Store Connect
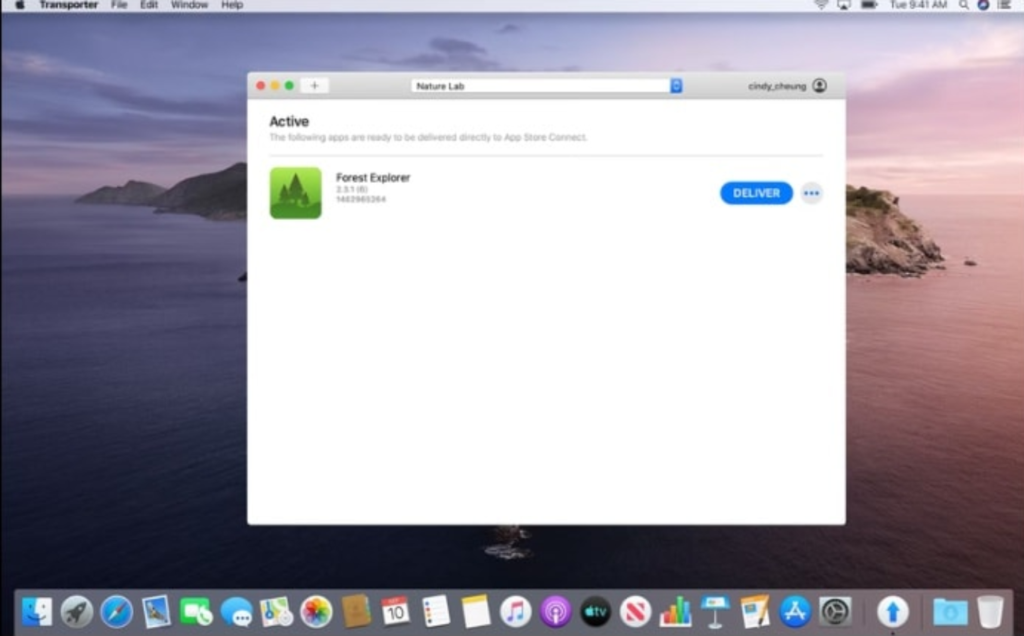
There are multiple upload tools for uploading to App Store Connect. To upload an .IPA file to App Store Connect for future distribution on the App Store or TestFlight, first download Transporter from the App Store on your iMac or MacBook.
After installation, sign into your Apple Developer Account.
Click the Add App button, or simply drag the .IPA file you wish to upload to App Store Connect.
Click Deliver. This will kick off a verification of the app through authentication with the App Store. This is followed by uploading the app where Transporter delivers the package to the App Store. Disposition the errors, or if successful, expect an email shortly from the iTunes Store regarding this version.
There you have it! You successfully resigned an .IPA file and uploaded it to App Store Connect. You can now use this build for TestFlight testing or submit it to the App Store. Success!
Error Disposition
This section includes the errors we have encountered and how to solve them.
Error: “ERROR ITMS-90046: “Invalid Code Signing Entitlements. Your application bundle’s signature contains code signing entitlements that are not supported on iOS. Specifically, value ‘<>‘ for key ‘application-identifier’ in ‘<>‘ is not supported. This value should be a string starting with your TEAMID, followed by a dot ‘.’, followed by the bundle identifier.”
Solution: We encountered this error when we did not properly codesign the app. In our case, we were submitting an update, modifying only the Info.plist, which required the app name folder to be resigned before uploading. Detailed steps above for the options to use with the codesign function within the Terminal. Note that sometimes this occurs when you include entitlements when you shouldn’t. Again, reference the steps above.
Error: “ERROR ITMS-90035: “Invalid Signature. Invalid Info.plist (plist or signature have been modified). The file path <> is not properly signed. Make sure you have signed your application with a distribution certificate, not an ad hoc certificate or a development certificate. Verify that the code signing settings in Xcode are correct at the target level (which override any values at the project level). Additionally, make sure the bundle you are uploading was built using a Release target in Xcode, not a Simulator target. If you are certain your code signing settings are correct, choose “Clean All” in Xcode, delete the “build” directory in the Finder, and rebuild your release target. For more information, please consult: https://developer.apple.com/library/ios/documentation/Security/Conceptual/CodeSigningGuide/introduction/Introduction.html“
Solution: If you modify the Info.plist, it must be resigned. Follow the steps above to utilize the codesign function.
Sources
- https://stackoverflow.com/questions/53302781/resigned-ipa-do-not-install-on-ios-devices
- https://help.apple.com/app-store-connect/#/devb1c185036
- https://developer.apple.com/library/archive/qa/qa1940/_index.html
- https://stackoverflow.com/questions/39652867/code-sign-error-in-macos-high-sierra-xcode-resource-fork-finder-information
- https://forums.developer.apple.com/thread/85607
- https://coderwall.com/p/qwqpnw/resign-ipa-with-new-cfbundleidentifier-and-certificate
- https://doc.owncloud.com/branded_clients/branded_ios_app/publishing_ios_app_2.html
- https://developer.apple.com/library/ios/documentation/Security/Conceptual/CodeSigningGuide/introduction/Introduction.html